

Cable Tree Welding Project
Build This Tree
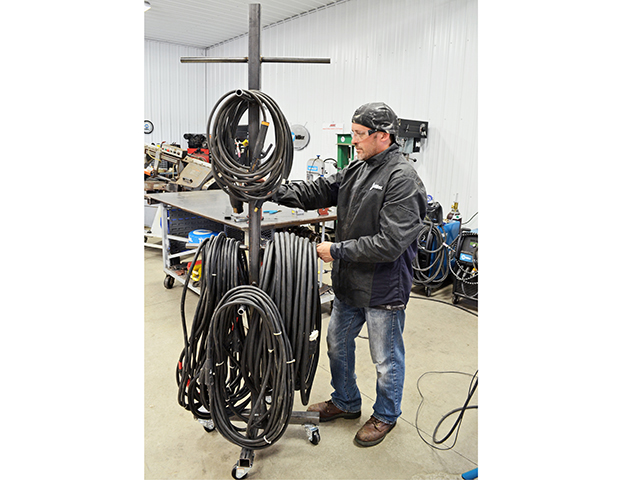
In another of our occasional welding project series, welder Joel Ort, Hortonville, Wisconsin, designs and builds a welding cable tree.
This is a simple project (a 3 on a 1-to-5 skill level), Ort says. The key is keeping everything square, especially making sure the arms that hold cables are square to the upright beam.
Materials include 2-inch-square tubing, 1-inch-round tubing and four heavy-duty casters. When it's completed, this assembly will peak out at seven feet from the floor. The height accommodates cables in Ort's shop that are 100 to 150 feet long.
"The reason for having a tall, movable cable tree is to hold long cables off the floor," he says, adding the beefy size of the material he uses has a purpose. "The cables are pretty heavy."
The welds for this project are straightforward. The bottom of the upright beam is welded to a cross-member assembly, itself welded to hold the casters.
P[L1] D[0x0] M[300x250] OOP[F] ADUNIT[] T[]
Use 90-degree magnet squares when building this assembly. They'll make your life much easier. The magnets keep the perpendicular pieces square. Magnet squares also prevent the steel from warping in the heat of welding.
Four caster wheels are clamped and welded, one each to the four ends of the cross-member.
The cable arms are welded to the upper portions of the beam at varying heights to meet the needs of portability and cable storage. Ort welded cable arms at four levels: the arm pairs at 90 degrees to the arms above and below. Use the magnet squares to keep the round tubing square to the upright beam.
One thing Ort did not do is weld tabs to the ends of the cable arms. "This isn't meant to be moved all the time, so the cables won't slide off accidentally," he says. "I also don't want tabs in the way, because with some of the heavier cable, I'll just want to slide them off."
But, as with any of the Progressive Farmer welding projects, the "right way" to build them is to make them work for your shop. "Make it your own," Ort says. "Something like the tabs, maybe they work best for your work. Make it for how you would use it."
Shop time: 3 hours
Shop cost: $150
Difficulty: 3 out of 5 stars
**
-- Watch the video at https://www.dtnpf.com/…
[PF_0821]
(c) Copyright 2021 DTN, LLC. All rights reserved.