Improve Your Planter's Performance
7 Maintenance Tips for Better Planting This Spring
COLUMBIA, Mo. (DTN) -- Achieving picket-fence stands of corn doesn't happen by accident. It requires planting when conditions are fit with a planter that was set up properly long before it was taken to the field.
"We believe that the job of the planter is not to put seed in the ground, but it's actually to get seed out of the ground," said Precision Planting Region Manager Brent Gerke. "Emergence is key."
During the company's winter conference event held in Columbia, Missouri, on Jan. 18, Gerke discussed the effect that proper seed placement has on emergence and ultimately yield. While he acknowledged that variables such as the weather can't be controlled, farmers do control how well their planter does its job.
"The planter pass is one of the few things that we can control in agriculture," he said. "If you can turn a wrench, you can improve your planter just by making a few simple adjustments."
In addition to encouraging attendees to have their seed meters tested and calibrated annually, Gerke offered seven maintenance tips for improving planter performance while it's still in the shop this winter:
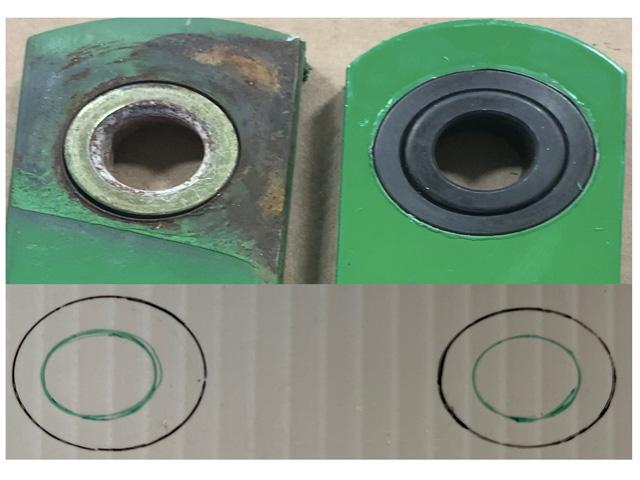
1. Parallel arm linkage -- Make sure parallel arms are tight and hold the row unit securely to the planter frame. Any "slop" in the assembly can allow the row unit to move while planting and lead to inconsistent seeding depths that create uneven crop emergence.
"I think of parallel arms like the alignment on your truck," Gerke said. "It's not going to cause an exponential increase in yield, but it's going to make everything on that planter perform better."
He said that as little as one-sixteenth inch of wear in the parallel arm linkage can be amplified to three-quarters inch of play in the row unit at the ground. He recommended that farmers consider replacing OEM parallel arms with aftermarket ones with double bushings.
2. Opening discs -- Inspect discs for excessive wear and ensure they are still true. Any wobble in the disc can lead to uniformity issues in the furrow. Make sure they are properly shimmed.
P[L1] D[0x0] M[300x250] OOP[F] ADUNIT[] T[]
"If the discs are gapped, they can create a W-shaped trench," Gerke explained. "The seed is not going to be able to fall all the way to the bottom of the trench, so you'll end up not only with potential depth issues but emergence issues as well."
Discs shimmed too tightly can cause excessive side load leading to premature failure of bearings and hubs. Gerke recommended that farmers inspect brand-new opening discs to ensure they are true.
"The guy before you might have checked them and put wobbly discs back on the pile," he added. "You don't want his bad batch."
3. Seed tube guards -- Gerke said the seed tube guard could be the most-overlooked wear item on a planter. In addition to protecting the seed tube, the guard also sets the width of the furrow.
"As it wears, opening discs can pinch tighter together, narrowing the trench and potentially preventing seed from reaching the bottom," Gerke said. "You don't want your $400,000 planter crippled by a $20 piece of metal."
4. Gauge wheels -- Properly shimmed gauge wheels firm the sidewalls of the furrow and ensure that dry soil doesn't cave in, which could affect planting depth and cause uneven emergence.
"Lift up the gauge wheel to planting position and then let go," Gerke said. "It shouldn't slam all the way down. It should make ever-so-slight contact with the disc openers that it slightly rotates. If it doesn't and it drops all the way down, we're not firming those sidewalls properly."
5. Seed firmers -- Gerke recommended replacing seed firmers before each season to ensure that there are no issues when pressing seeds into the bottom of the furrow.
"They're not meant to be used and abused for five to 10 years at a time," he said. "If your Keetons are kinked up and looking like a piece of spaghetti, are they giving you that seed-to-soil contact you're after? I doubt it."
Even if the firmers don't appear to be worn, they can lose their elasticity with use, he explained. He recommended measuring the tension with a fish scale.
"Set your planter down on a concrete surface, then hook onto the end of the firmer," he said. "If it comes off the ground with less than 16 ounces of tension, that firmer is worn out."
6. Closing system -- Make sure the closing tail is firmly installed with no side-to-side play and that closing wheels are properly spaced and aligned over the furrow. Check the spring tension to ensure that enough force is being applied to properly close the furrow. Gerke suggested placing a bathroom scale under the closing wheels to measure the force.
"Also, inspect where your spring attaches, because that's another wear area," Gerke said. "Nothing is more disheartening than walking into a planter inspection in June or July and seeing springs hanging down, knowing that last field of the year didn't get closed up."
7. Calibrate planter depth -- While the components on all row units receive wear, they don't necessarily wear at the same rate. This, Gerke explained, can lead to variation in planting depth from row to row. To account for this, he recommended that farmers perform a depth calibration on each row unit.
"Set the planter down on a level surface, then drop your T-handle all the way down so that your depth is as deep as it can go," Gerke said. "Slide two known widths of lumber underneath the gauge wheels, then bring your T-handle back up until it stops. If your T-handle is at the same notch on every single row, I would be surprised."
Precision Planting offers more tips for planter maintenance here: https://www.precisionplanting.com/…
Jason Jenkins can be reached at jason.jenkins@dtn.com
Follow him on Twitter @JasonJenkinsDTN
(c) Copyright 2023 DTN, LLC. All rights reserved.


